I took a LOVELY trip to Disneyland this spring with a bunch of girlfriends from the Disney Parks Moms Panel. The occasion was Dapper Day on the West Coast, and we wanted to Disneybound as Princesses, in any fashion we chose. I immediately knew I wanted to build a Pink Cinderella dress from a 1950s pattern, but felt daunted on where to start. In order to get the creative juices flowing, I started with accessories. One needs a purse at a Park, so I chose an inexpensive leather bag from Poshmark and decided to make it over as a Hand Painted Cinderella Purse with Gus Gus on it.

Painting Supplies Needed
You can’t paint a purse without paint! I already had several acrylic paint colors that I needed. In this case, green, black, white and pink, because the brown of the purse was going to act as the “base color” for Gus. Less painting for this initial, experimental project. I also picked up 1/2″ thin ribbon that looked like a measuring tape for fun. I didn’t even know how I was going to incorporate it yet!

Removing the Purse’s Leather Strap
I did know that I wanted the leather woven strap gone. It’s too 90s, and unlike the “young folk” today, mistakes were made in that era and I am not really keen on repeating them. A few simple snips later and the leather rope was removed and tossed. I considered weaving the measuring tape through the gold chain purse strap, but decided against it as the ribbon would buckle.

Cinderella Character Design
Next up, choosing the incarnation of Gus Gus. Located on Pinterest is a dead-end image of Gus on a lunch sack, and I knew that was it! I cropped, zoomed and printed out a copy of Gus, covering the back with graphite and tracing it onto the leather. This old leather purse was porous, meaning I had only one chance to trace and get it right, lest I be left with error lines. After the pencil lines were drawn, I went over them again and connected the dots to make sure I could see what I was doing.
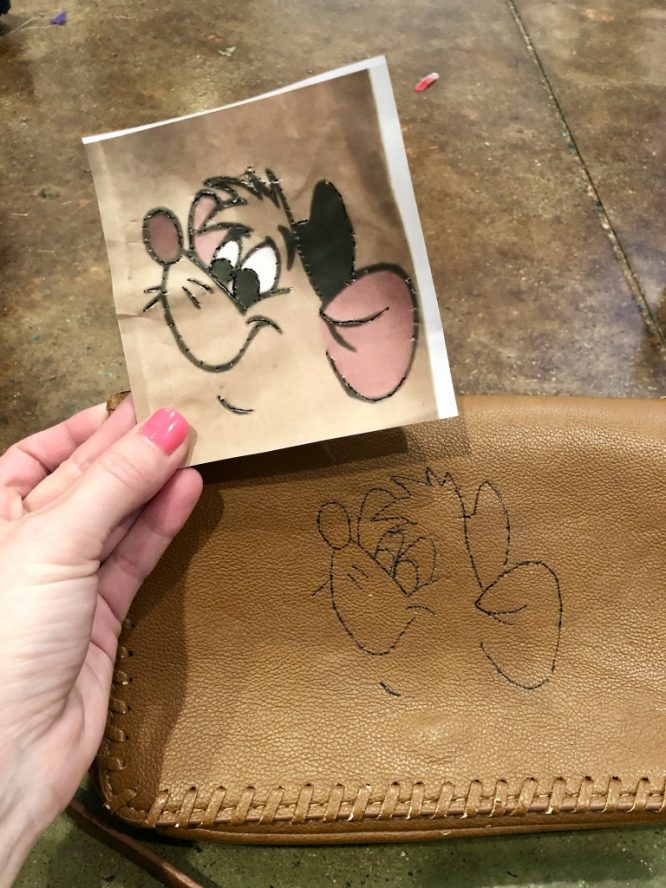
Next up, a thick Sharpie was handy to overlay the graphite lines and cement down what I was painting. Much like my Project Studio crafts, the Sharpie lines are thick and rich, allowing me to use them as the cartoon inking and not have to erase them.

Hand Painting Gus Gus
Now came the fun part. The acrylic paint in its primary color form can be a bit… runny? You’ll want to add a dash of white into whatever color you are using so the paint appears more opaque and less thin. Lighter colors may need a second coat or additional coat to mask your brush strokes. After the purse was dry, the 11th hour before my California Disneyland departure, I had the stroke idea to wrap the measuring tape around the uppermost handle. This gave a spot of color and small detail of sewing where nothing else would. An homage to Gus Gus’ assistance in sewing!

Hand Painted Cinderella Purse Finished Look
VOILA! An $8 Poshmark Leather purse turned into a fun Dapper Day Accessory with Cinderella’s Gus Gus on it! While I was a total goober and focused my energy on getting photos of the Parasol, I don’t have a photo of me all dressed up with the purse! I think I was unsure that the brown leather matched the whole cohesively. I regret not taking a full photo! Instead, I offer you this styled-at-home shot of the finished product:

You can also see my Hand Painted Cinderella Parasol I made for Dapper Day at Disneyland. These were the first accessories I decorated for the occasion and I adored it! You can also find my Dapper Disneybound Orange Bird look here!

I love Gus Gus, he is so cute. This came out great!
So cute! I love Gus Gus, and I really like your Disney DIYs.
Thank you so much! Is there a character you’d like to see me do? I love inspiration! 🙂
I’d love for you to do one based on who framed roger rabbit!
Oh my goodness I LOVE this idea. Maybe a pair of custom vans? If I can find a bag to paint, I’ll do it that way. Thank you for the inspiration!