The following post was written by husband, Chase! It’s not the first post he’s written for me, and I’m hoping that it won’t be the last. He is truly a grill-master, winning a ribs contest last year (among friends), making the best grilled chicken my mouth has ever had, and now perfecting steakhouse quality meat at home! Here are his 6 steps for grilling the perfect steak.

Grilling ain’t easy.
The first time I remember trying to grill a bunch of steaks for my roommates in college on our first night in our first apartment. They were good cuts, and I wanted to marinate them in something to give them some kick. I threw all kinds of stuff in there (ranch dressing I think was a main ingredient) until they the steaks were unrecognizable. I haphazardly threw them over some coals on a community grill, burnt them to a crisp, and choked them down. I still get embarrassed every time I think about it. Let me save you a similar painful memory with these 6 tips on how to grill the perfect steak.

How to Grill the Perfect Steak
Step 1: Choose the steak
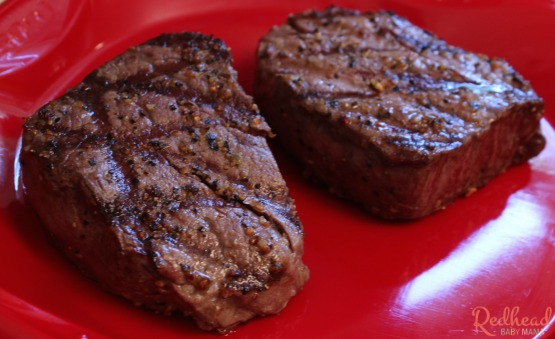
Start at the butcher’s counter (not just the meat coolers at the grocery store). Find a good cut of meat – I prefer something with a little fat on it like a Ribeye or New York Strip (more on WHY later), but today I’m cooking Filet Mignon, which is the leanest and tenderest cut you’ll find. When cooked right it melts in your mouth! The meat should be pink-red in color and tender to the touch, and I prefer my steaks at least an inch thick. Just remember a thicker steak takes longer to cook.
Once you get it home, throw the steaks in the fridge – remember to store red meat below ready to eat food and raw seafood but above ground meat and poultry to avoid cross contamination. Unless you HAVE to, DO NOT freeze your steaks.
PRO TIP – just because it’s on sale doesn’t mean it’s bad! Check the expiration date and don’t worry about a good deal, save that money!

Step 2: Bring the steak to room temperature
Your steak is won or lost in the preparation stage! There are 3 “secrets” I had to learn to make the perfect steak and this is one of them. Anything you grill (including chicken or fish) should be at room temperature before it goes on the grill if at all possible. This allows the cut to cook evenly without making as huge of a temperature change throughout.
PRO TIP – Take your meat out of the fridge at least 4 hrs before you plan on grilling it.
Step 3: Prepare the steak
When you start the steak preparation stage, go ahead and turn your grill on high and leave the lid down. If you want those pretty grill marks, the grill itself has to get super hot. I usually coat my grill grate with a spray oil, too, prior to heating. Today I’m using a gas grill, so if you’re using coals just make sure the heat is high and consistent – I’d say around 400 degrees should do the trick.
To prep your meat you’ll need the following:
Meat
Butter
Seasoning (we love Montreal Seasoning but good old salt and pepper is fine, too)
Here’s the second “secret” I learned in making the perfect steak – butter. I’m not talking a lot of it; for these 4oz filets I used enough to butter a piece of toast. A little goes a long way – and it’s best to massage it in by hand so you can work the meat and get it in all the crevices possible. This is going to give it that nice restaurant style crust on the outside and allows the seasoning to stick and caramelize on the outside. (If you are afraid of butter you can also use oil, but in my opinion it’s not as good.)
Next take your butter covered hands and rub your seasoning in, again getting it good and in every crevice. Be careful not to over-season – you want to taste the steak, not a buttery salt lick! By now your grill should be ready for these bad boys!

Step 4: Grill the steak
Every grill has it’s hot spots and I like to put my steaks near there. If you aren’t sure hold your hand about 2 inches from the grill surface and move it around to judge the heat – you’ll be able to tell which is hotter.
Lay your steaks on the grill. Leave your hood OPEN. With the butter on the steaks you may get flare-ups; this is ok because it can add to the flavor of the steak, but keep watch to make sure it doesn’t get out of hand. Don’t fuss with the meat until you’re ready to turn it.
Let’s take a break and talk about how you want your steak cooked. I go for rare-medium rare, where the middle is red and somewhat cool. I can go as high as medium, but anything past that is a waste of steak. There, I said it. Medium-well and well-done steaks are a waste of money. They have no flavor and taste like rubber. Don’t ruin a perfect steak by overcooking it.
Grills will vary, but my recommended cooking times per done-ness are:
RARE – 2-3 minutes per side
MEDIUM-RARE – 4-5 minutes per side
MEDIUM – 5-6 minutes per side
MEDIUM-WELL – 7-8 minutes per side
WELL – 9+ minutes per side
Thicker steaks take longer, so add minutes if you have a steak thicker than 1 inch and subtract a minute if it’s thinner. Always remember – if a steak is UNDER-cooked you can always throw it back on the grill, but can CANNOT fix an OVER-cooked steak, so when in doubt take it off early.
PRO TIP – If you have a fattier cut like a NY Strip or Ribeye do three things: rub extra butter in the fat, lower the grill temp slightly, cook for slightly longer. You want to caramelize that fat a bit so it melts in your mouth. Trust me on this – if done right the fatty parts mixed with the meat of the steak will have them raving about it for all of time.
Step 5: Rest the steak
We’re not done yet! Here’s the third “secret” to completing your perfect steak and it’s VERY important. Once the steaks are done and off the grill put them on a plate to the side for 10 MINUTES. They need to cool and reabsorb the juices that are flowing in and on the steak. If you cut in to it before then they’ll leak all out on the plate and take away from the flavor. BE PATIENT. Your steaks won’t get cold, they just need a few minutes to calm down.
Step 6: Eat the steak!
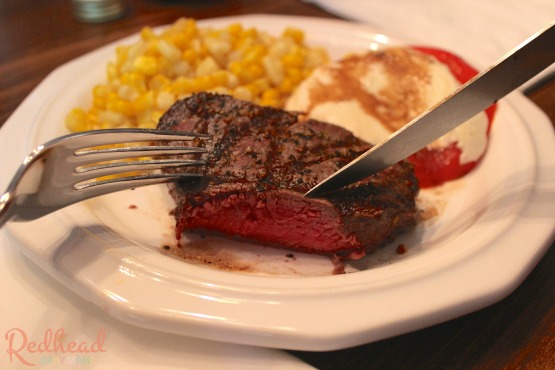
Plate your masterpiece and enjoy! Next time I’ll cover How To Grill The Perfect Chicken Breast!
Leave a Reply